Showing posts with label कम्प्युटर. Show all posts

Why “C” Is The Default Drive On Your Computer & Not A Or B?

kisan | 2:23 PM | 0 comments


A long time ago it was difficult to have a personal computer. Working with a computer was this kind of deluxe nobody could potentially purchase. But, in today’s world the amount of computers owners are increased drastically than it was thought by the creators. and have you checked out ? it’s the most crucial machine these days. Right now of Tech world, it’s not surprising if anybody says that computer is the central element of a human.

Even though you may be utilizing the pc for several days, most likely there would be a lot of things that have been unfamiliar to you. If you work with the computer for many days, then listed here is a concern for you. 

Hard disk drives turned into standard since 1980. Earlier hard disk drives, Floppy disk drives were utilized as the storage devices. Floppy disk drives were the first storage devices. They came to existence since 1960’s. Floppy disks was available in two sizes 5 1/4 ” and 3 1/2″. Those two floppy disk drives were labelled as Local Disk (A) and Local Disk (B). After the innovation of Hard disk, floppy disk of size 8 inch was introduced. Currently Floppy disk drives and Floppy disk drives changed the floppy disks.

That’s why at the rear of the labelling of hard drives. Consequently, drives besides default drive (C) labelled as D, E etc. DVD drive and USB drive are labelled as F, G and so forth.

Still “C” drive is available as the standard, you are able to change it to A or B if you’ve got the administrative rights.


Now you know Why is C the Default Hard Drive Of Your Computer!


If you attach too many drives and all letters till Z are assigned, then if there is no more drive letter is free to assign, then whatever next drive you connect it won’t be shown in Windows OS.


Source: Different Online Media

How to download a website using HTTrack

Unknown | 10:30 PM | 2comments

To download a site using HTTrack, follow these simple steps.
    HTTrack website copier
      how to use httrack copier
    • First you need to download HTTrack software. It’s a free tool and you can get it here.
    • After the software is downloaded, install it on your computer and launch the software.
    • You can see a window same as below. Here every website is treated as a New Project. Click on Next to continue.

    • A new window will appear asking for a project name and category. Enter them according to your wish. Here you can see Base path which is the location where you want to save your website. Click on Next to continue.
    • Here you have to enter the website address (URL) in the text area provided and you can use the Action option according to your requirement. In this case, just leave it as download website(s) and click on Next button.
    • Now another window appear, just click on Finish button and your download will be started.
    • Here you can see the status of your download. Wait until the website is downloaded to your computer. If you want, you can cancel the download by clicking on cancel button.
    • downloading status
    • Now click on View error log to check for errors. If you find any errors like duplicate of web pages then fix them manually. If you find more errors, then it’s better to download another copy of the website again by using HTTrack.
    • You can see your downloaded site by clicking on Browse Mirrored Website button. Click on  Finish button to download another website to your computer.check for errors in HTTrack
    • You can also open the website in another way. All you need to do is, just go to the Base path (here C:UsersajithMywebsites) i.e. the location where you’ve saved your website. There you can see index.html file. Just click on that file to open your downloaded website.
    • alltechtricks.in

How To Charge Your Android Battery Faster

kisan | 5:22 PM | 2comments


For Android users, we are here with Best Ways To Charge Your Android Battery Faster. Today more than billions are using an Android device and everyone knows about the battery life of Android device which reduces very quickly and takes a lengthy time to recharge, just because of lots of apps running in the background. Normally Android takes up to 2 hours to charge. But the charging time can be minimized by some simple tweaks. So have a look at the ways below.

#1 Use Airplane Mode While Charging
In Airplane mode, all your networks get stopped and that is always the best mode to charge your Android. As at that time your battery consumption will go very down and you can easily charge it with great efficiency. Even this tweak can reduce your charging time to up to 40% so must try this.

#2 Turn off Your Phone If Possible for faster ChargingThis mode is most effective when you need emergency battery charged in a very short time. In this mode you, battery consumption goes to zero and it gets charged quickly as compare to the running Android with lots of running apps

#3 Turn Off Mobile Data, Wifi, GPS, and Bluetooth
While charging, you should Turn Off Mobile Data, Wifi, GPS and Bluetooth in your Android as they consume lots of battery and your battery charging process will be longer with all these on. So better is to turn them off and enjoy the fast charging.

#4 Use Original Charger Adapter & Data Cable
Only the products that are specially designed for your Android from the manufacture are the best compatible with your Android. So better is to use the original charger for quick battery charging.

#5 Use Battery Saving Mode
This doesn’t help you to charge your battery fast. However, you can use the inbuilt function which comes as the stock option to many models. If you have Android Lollipop or later version then you could find the battery saving option in settings. Switch this on to conserve power while your phone recharges
#6 Never use your phone while in Charging
Many rumors are there which shows that using a phone while charging make smartphones to explode, but it is yet to be proven. But one thing is for sure that using your smartphone while charging will increase your overall charging time. So we suggest you to never use smartphone while charging
#7 Never charge your phone from PC or Laptop
The reason behind this is very simple whenever you charge your phone from PC, it will not do any benefit to your phone because computer USB ports are typically 5V @ 0.5 amp. Since the USB provides half the current, it charges the phone at half the speed.

#8 Don’t charge battery from 0 to 100%
The study claims that full recharge will shorten the battery’s lifespan. However, you might have noticed that whenever your phone’s battery reaches the 50% mark it starts to drain itself more quickly compared to 100% to 50%? Actually, this happens. So, make sure charge your phone whenever it is about to reach 50% and remove the charger whenever it reaches 95% you will experience better battery life and fast charging too.
#9 Use Clean Master
Clean Master is the World’s Most Trusted Android Optimizer, Speed Booster, Battery Saver and Free Anti-Virus app, Clean Master Helps Accelerate and Clean Up Over 600 Million Phones. It Also Provides Real-time Protection With the #1 Antivirus Engine, and Secures Your Private Data with the AppLock Function. The key benefit of using this app is that you will get an option to install the extension named Boost charge, which really helps to reduce overall charging time. Moreover, it is all in one app that you must have for overall performance.
#10 Start Using Fast Charging Android app
Fast Charging is an ultimate tool, which can boost your battery charging speed by 20-40%. This app will automatically activate when you connect your charger and it will boost your charging speed. When you connect your charger, Fast Charging will detect it and limit the power consumption of your phone/tablet. Then your battery doesn’t withdraw much power during the charging time and, therefore, it can charge very quickly.
So above is all about Best Ways To Charge Your Android Battery Faster. With the guidance of all these tips discussed above, you can easily charge up your Android device within 30-50% reduced charging time. Hope you like our work, do share these tips with others too. Leave a comment below if you have any related queries with this.

Courtesy: Different Online Media

6 Different Ways to Download Videos from YouTube to your PC and Mobile

kisan | 5:51 PM | 3comments

1. Add SS before youtube
This is one of the most popular method on the internet for downloading youtube videos on PC and mobile. To download videos, just need to add a “ss” before the “youtube” in your URL, turn it into “ssyoutube”. For example, the URL of https://www.youtube.com/watch?v=TmprPSZFBpk, now add a “ss”, the URL changed to https://www.ssyoutube.com/watch?v=TmprPSZFBpk. Then the browser will parse the URL and skip to a window like below:Download Youtube Video from Adding SS
Download Youtube Video from Adding SS
2. From VLC Media Player
We’ve discussed plenty of ways to download YouTube videos before. However, you have one option already installed on your computer. VLC lets you play and download YouTube videos right from its desktop interface. Here’s how:
    • Find a video on YouTube—like this one—and copy the URL from the address bar.
    • In VLC, head to Media > Open Network Stream.
    • Paste the YouTube link in the box and click Play.
    • Under Tools, click Codec Information.
    • In the box that says Location, right-click the block of text and click Select All. Copy this text to your clipboard.
    • Go back to your browser and paste the link in the address bar. This will open the source file directly on YouTube’s servers.
    • Right-click the video as it plays and select Save Video As.
You can also record clips from YouTube videos as they’re streaming in VLC by pressing the red Record button in the player itself. This isn’t as direct of a rip, but it’s handy if you need to grab a particular clip out of a long video.
Download  VLC : Click Here

3. Vidmate Android app

Vidmate Android app
Vidmate is one of the best-known applications currently available for downloading videos and songs from online services like Vimeo, Dailymotion, YouTube and lots more. Just download this app from below link. Install on your phone and you can download any youtube video with the help of this app.
Download  Vidmate : Click Here

Image result for tubemate
4. Tubemate Android app
Tubemate is one of the best-known applications currently available for downloading videos and songs from online services like Vimeo, Dailymotion, YouTube and lots more. Just download this app from below link. Install on your phone and you can download any youtube video with the help of this app.
Download  Vidmate : Click Here


How to Live Stream to Facebook Pages From PC or MAC

kisan | 5:15 PM | 0 comments

You could live stream to the facebook and for that, your profile is used but what if you wish to stream to the facebook pages that you manage or you are part of them? So, you want to live stream from the PC or Mac to any of your facebook pages just go and read the article to know about it.

Steps To Live Stream to Facebook Pages From PC or MAC
1.           The very first thing that you would need to know is that you should install up the OBS Studio software on your computer and not the previous version of the software named OBS Classic and if you do install the previous version you won’t be able to perform up the task of live streaming Facebook because it isn’t supported.

    2.       Now open up the Facebook, log in to your account and then go to the           page you want to live stream on. After reaching on the page click on the      “Publishing Tools” option from there which you could easily find upon           above of your screen.

 Live Stream to Facebook Pages From PC or Mac

 Live Stream to Facebook Pages From PC or Mac3. Select up the “Videos” option from the sidebar that appears after you have applied up to the above step. Next to that click on the button saying “Live” option and thereafter proceed for the further steps.

 Live Stream to Facebook Pages From PC or Mac4. You will now see that there comes above the pop-up which would be carrying up the Stream key, just copy that Key from there. Keep in mind that you correctly copy that key because this will be required while using up the OBS Studio. After copying up the Key press on the Next button.

 Live Stream to Facebook Pages From PC or Mac5. Launch the OBS Studio and then from there Click on the Settings, From there look for the Stream option in the sidebar that appears. Just paste up the Stream Key you just copied in the previous steps inside the box that appears on your screen. Select “Facebook Live” option under the Service tab and then click on the OK button.
 Live Stream to Facebook Pages From PC or Mac

 Live Stream to Facebook Pages From PC or Mac
6. After all that you would need to add up the sources to the OBS Studio like Webcam or any video placed inside any folder which would be live streamed. To do that just click on the “+” icon under the Sources box inside the software. From the List menu that appears just select up the Video Capture Device option and then name it, click on the OK button after that.


 Live Stream to Facebook Pages From PC or Mac7. In the next window that appears just select your Video Capture device you just named in the above step, and then after that click on the OK button! You would now see your video capture device’s input inside the OBS studio which would be Live Streamed to the Facebook Page, to begin up the streaming just click on the Start Streaming Button!

For OBS download : Click Here
Courtesy:  Different Online Media


Make Partition Of Hard Disk Without Formatting

Unknown | 11:29 PM | 0 comments

How To Make Partition Of Hard Disk Without Formatting 
Many of us want numbers of partitions to store different data in different drives as it becomes comfortable for us to determine and locate a file. So we can shrink fascinating data from a drive and can create a new drive with shrunk space. For example, if we have the drive of 200Gb and it is approximately 80gb full with data and remaining 120 Gb is free, here we can shrink 100Gb and create a new drive. In this way, there will be two drives of 100Gb each. 

Steps To Partition A Hard Disk:-
Partition A Hard Disk Without Formatting
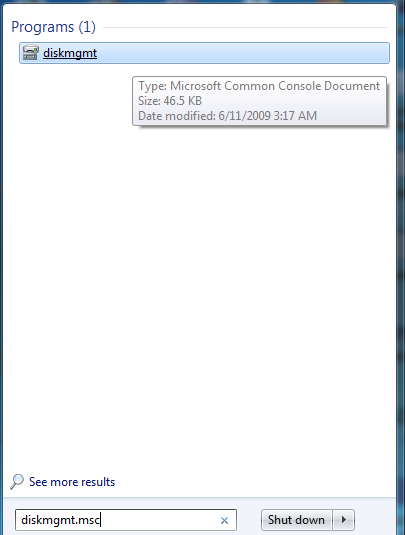
Step 1. Click Start and type “disk mgmt.msg” (without quotes) and press enter. Now a disk management window will appear.

Partition A Hard Disk Without Formatting

Partition A Hard Disk Without Formatting
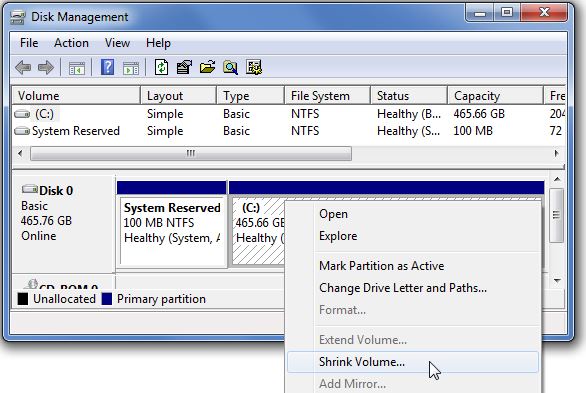
Step 2. Here you can see all your drives which are being currently available. Choose one of the drives which you want to shrink or extend. For shrinking, a drive and creating a newone there must be some free space on that drive. Now right-click on the drive letter which you want to shrink Or take out free space. Now select shrink volume, & a little process will go on.
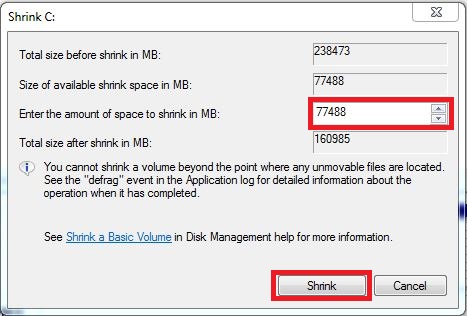
Partition A Hard Disk Without FormattingStep 3. Here you will see the current size of the drive, free space and size which you want to shrink. Now enter the amount of space which you want to free, note that size should not exceed the free space. Now click shrink button.

Partition A Hard Disk Without Formatting

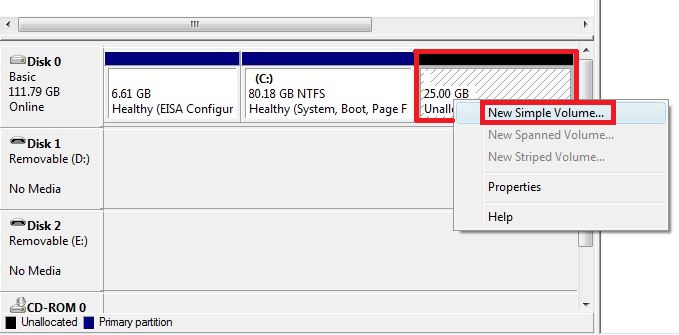
Partition A Hard Disk Without FormattingStep 4. In disk management window you will see an unallocated space at the right bottom corner. Right-click on it and select New Simple Volume.

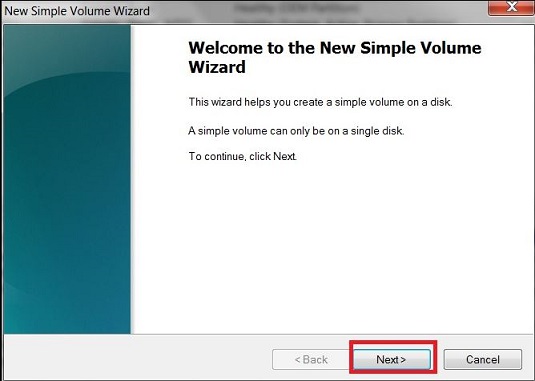
Partition A Hard Disk Without FormattingStep 5. Now you will be taken to “New Simple Volume Wizard” here you need to create a partition. Simply click “Next” to continue.


Partition A Hard Disk Without Formatting
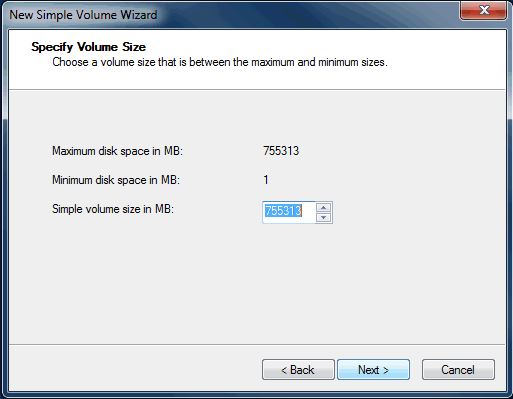
Step 6. Now on the very next page, you need to specify the volume size. You need to add the volume size here. Simply enter the volume and click on next.


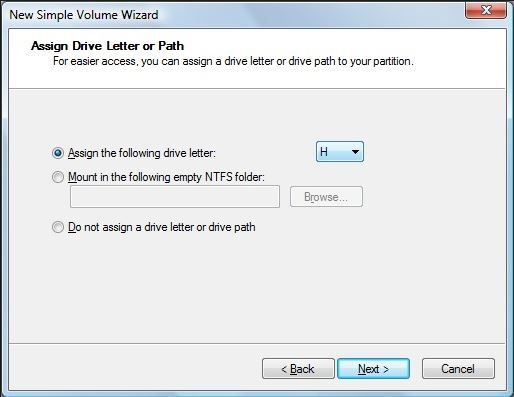
Partition A Hard Disk Without FormattingStep 7. Now you need to assign the drive letter. You need to drop down and select a letter of your choice.


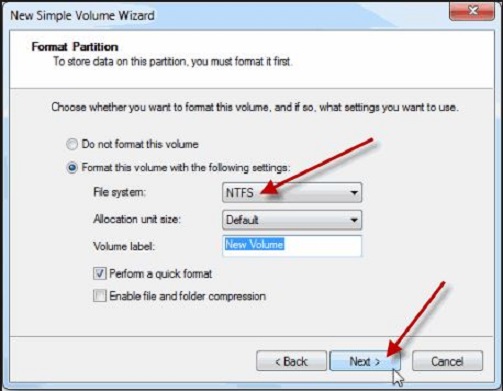
Step 8. Now you will be taken to “Format Partition” page. Simply select the File system to“NTFS” and then Enter the name for your new drive and hit the “Next” button.
Partition A Hard Disk Without Formatting

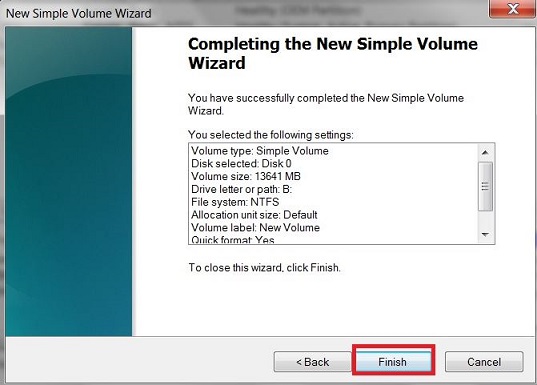
Step 9. Now it will format and you will see the summary window of your newly created drive. Simply click on “Finish” and enjoy.

Partition A Hard Disk Without Formatting

In the same way, you can enlarge the size of any drive when your drive gets overloaded by file, In that case, you can easily make some space unallocated by shrinking it from one drive and then using that space to extend another drive. By this way, you can easily Partition A Hard Drive without formatting them.
Please note that do not try to create partitions more than 5-6 as it can corrupt your windows also. In Corresponding do not make only one partition as when you will install a brand-new operating system all data will be deleted. 
Courtesy: TechViral.com

कम्प्युटरमा भाइरस पसेको कसरी थाहा पाउने ? कसरी बँच्ने ?

kisan | 7:55 PM | 0 comments

हामी अहिले साइबर युद्धको युगमा छौँ । तपाइँलाई थाहै नदिइकन तपाइँको कम्प्युटर भाइरसद्धारा संक्रमित हुनसक्छ र अदृश्य ठाउँबाट कुनै ह्याकरले तपाइँको कम्प्युटर नियन्त्रण गरिरहेको हुनसक्छ । तपाइँको ल्यापटपका डाटाहरु साइबर अपराधीहरुले चोर्ने खतरा पनि हुन्छ ।
त्यसैले आफ्नो पिसिलाई ह्याक हुनबाट वा भाइरसबाट जोगाउन सचेत हुनुपर्छ । कम्प्युटरमा भाइरस घुसेको थाहा पाउने केही लक्षण निम्न छन् :
  • पिसीको गति निकै धिमा हुन्छ । कम्प्युटरमा धेरै डाटा लोड नहुँदा पनि गति निकै धिमा हुन थाल्छ ।
  • इन्टरनेट ब्राउजर आफै खुल्ने वा पपअप विन्डो आफै खुल्ने भयो भने पनि भाइरस छिरेको लक्षण हो । ब्राउजर बन्द गर्दा पनि बन्द हुनेबित्तिकै आफै खुल्ने लक्षण पनि भाइरस संक्रमणको हुनसक्छ ।
  • कम्प्युटरमा सेक्युरिटी विज्ञापन आफै देखिनु, ल्यापटप संक्रमित भएको चेतावनी जारी हुनु तथा सेक्युरिटी सफ्टवेयर डाउनलोड गर्न आफै सूचना पप अप हुन्छ ।
  • इन्टरनेट खोल्दा आफुले अर्कै बेवसाइट लगअन गरेको बेला अर्कैमा रिडाइरेक्ट हुनु ।
  • अनावश्यक वा चिन्दै नचिनेका वा अप्रासंगिक इमेल आउनु, फेसबुक वालमा आफुले पोष्ट गर्दै नगरेका कुराहरु पोष्ट हुनु ।
कसरी जोगिने ?
  • पेनड्राइभ ल्यापटपमा घुसाउँदा सुरुमा भाइरस स्क्यान गरिसकेपछि मात्र खोल्नुहोस् ।
  • तपाइँको इमेलमा आएको वा अरु कुनै साइट खोल्दा ध्यान दिनुहोस् । यदि उक्त वेबसाइट आधिकारिक वा सुरक्षित हो भन्नेमा तपाइँ ढुक्क हुनुहुन्न भने त्यसमा क्लिक नगर्नुहोस् ।
  • इमेल तथा सोसल नेटवर्कमा पठाइएका विभिन्न खाले बधाइ तथा शुभकामना लगायतका शंकास्पद इमेल खोल्ने तथा त्यसमा दिइएका लिंक ओपन गर्ने गर्नुहुँदैन । त्यस्ता शंकास्पद इमेललाई सोझै डिलिट गर्नुहोस् ।
लिंक सुरक्षित हो वा भाइरस जन्य हो भन्ने कुरा कसरी थाहा पाउने ?
  • तपाइँलाई पठाइएको वा लगअन गर्न खोजेको साइटको लिंक युआरएल निम्न लिंक safeweb.norton.com र siteadvisor.com मा गएर टाइप गर्नुहोस त्यसपछि त्यो साइट सुरक्षित हो की भाइरसजन्य हो थाहा हुन्छ ।
courtesy: onlinekhabar.com 

CREATE BOOTABLE WIDWOS 7,VISTA,XP USB FLASH/PEN DRIVE

kisan | 12:51 PM | 0 comments
Requirements to create bootable Windows USB: 
# Windows 7 or Vista ISO 
# Pen drive with 4GB+ (2 GB is sufficient for XP) 
# 15 Minutes of free time 

Procedure: 
1. Insert your USB flash/pen drive to your system and backup all the data from the USB as your USB drive will be formatted during the process. 
2. Now download software WinToFlash tool (free).(FROM google) 
3. Run the tool, and browse to your Windows 7, Vista, or XP DVD files (make sure that your USB drive letter is correct). 
4. Click Create button to begin the bootable USB process. Wait for few minutes to see the bootable USB. 
5. That’s all! 

How to Copy Text From Any Image

kisan | 12:45 PM | 0 comments

How to Copy Text From Any Image
Do you need certain information in the form of text from scanned copies of documents.Either you can write the whole text by typing or you can use an OCR software.OCR (optical Character recognition) is method to extract text from images.It can recognise handwritten,printed or typewritten text and can reproduce them into editable word ortxt format. These OCR software also preserve the formmating of the orignal scanned document into converted document.They are not 100% accurate and the converted document still requires some editing.But it is better to use an OCR software and do some editing rather to type the whole Doument.

if you have microsoft office installed in your computer then you won’t need any other third-party software as you can useMicrosoft Office OneNote to copy text from image.
Trick to Copy Text From Any Image

For this you have toinstall MS-Office on your system. Now openMicrosoft Office OneNote (Start–>All Programs–>Microsoft Office–>Microsoft Office OneNote). Drag and Drop the image in the MS-OneNote window from which you want copy the text. NowRight-Click on the image and selectCopy Text From Picture option.

OpenNotepad orMS-Office (where you want save the text) andpaste the content there. Now you have the whole text in your notepad or Ms-Office.You can edit or format it and save only the required excerpt.

कम्प्युटर योगा कसरी गर्ने ?

kisan | 3:42 PM | 0 comments

दिनभरी कम्प्युटरमा काम गर्दागर्दै हैरान हुनुभएको छ ? दिनभरी कम्प्युटर चलाउँदा चलाउँदै आँखा दुख्ने, टाउको दुख्ने, ढाड दुख्ने जस्ता समस्या पनि उब्जिएका होलान् । तर चिन्ता नलिनुस् तपाइँले कम्प्युटरमा काम सँगै योगा र ध्यान पनि गर्न सक्नुहुन्छ जसले तपाइँलाई स्फूर्ति प्रदान गर्ने मात्र होइन स्वास्थ्य समस्या पनि दूर गरिदिन्छ ।
हो, कम्प्युटरको कामबाट केही मिनेट ब्रेक लिएर तपाइँले कम्प्युटर योगा गर्न सक्नुहुन्छ । केवल पाँच मिनेटको कम्प्युटर योगा तपाइँलाई स्वस्थ राख्न पर्याप्त हुनेछ ।
कसरी गर्ने कम्प्युटर योगा ध्यान ?
एकछिन कि बोर्डबाट हात हटाउनुहोस् । आँखा चिम्लिनुहोस् र आफ्ना सेवाग्राहीको भलोको कामना गर्नुहोस् ।
तपाइँलाई अनुकुल हुने वा सधै सम्भिmरहने कुनै मन्त्र वा वाक्य उच्चारण गर्नुहोस् ।
आत्मशान्तिको लागि भगवान सँग प्रार्थना गर्नुहोस् । यदि तपाइँलाई इश्वरमा विश्वास छैन भने शुद्ध हृदयले आत्मशान्तिको कामना गर्नुहोस् ।
आफ्नो जिवनलाई सकारात्मक बाटोतर्फ लग्ने प्रण गर्नुहोस् ।
मनलाई शान्त बनाउनुहोस् र एक मिनेटसम्म ओम शान्ति मन्त्र जप गर्नुहोस् ।
केही समयको लागि शरीरलाई विश्रामको अवस्थामा छाड्नुहोस् । त्यसपछि आँखा खोल्नुहोस् । तपाइँले आफूमा नयाँ उर्जा संचार भएको पाउनुहुनेछ । त्यसपछि तपाइँ नयाँ उर्जाका साथ कम्प्युटरमा काम गर्न थाल्नुहुनेछ ।
यो कम्प्युटर ध्यान योगा तपाइँ आफ्नो कार्यस्थलको कुर्सीमै यथास्थितिमै बसेर गर्न सक्नुहुन्छ । दिनमा दुइ तिन पटक यस्तो कम्प्युटर योगा गर्दा कम्प्युटरले पूराउने हानी कम हुनेमात्र होइन तनाव तथा अरु स्वास्थ्य समस्या पनि कम हुने योग विज्ञहरुको दाबी रहेको छ । एजेन्सी
 
Support : Log Back | समाचार | Goto
Copyright © 2011. KISAN Infotainment...... - All Rights Reserved
Template Modify by KISAN Infotainment
Proudly powered by test